玩嗨 OpenHarmony:基于 OpenHarmony 的 ArkUI 翻页时钟
原文引自:51CTO 开源基础软件社区 #夏日挑战赛# OpenHarmony – 《ArkUI(TS)开发翻页时钟》

1. 项目背景
翻页时钟(Flip Clock)是一种有趣的机电数字计时设备,用电脑动画的方式实现翻页时钟,也是一种特别的复古UI交互体验。
本项目岂在通过OpenHarmony的ArkUI框架,用TS扩展的声明式开发范式eTS,来实现翻页时钟的体验。
本项目的开发环境如下:
- 工具版本:DevEco Studio 3.0 Beta4
- SDK版本:3.1.6.6(API Version 8 Release)
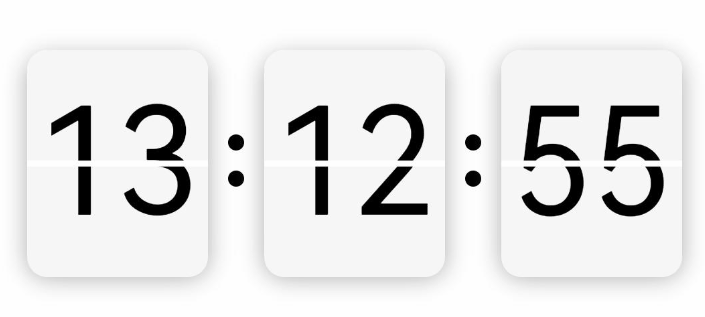
具体实现的效果是这样的:
本项目的主要知识点如下:
- UI状态:@Prop、@Link、@Watch
- 形状裁剪属性:clip
- 显式动画:animateTo
2. eTS开发范式
基于eTS的声明式开发范式的方舟开发框架是一套开发极简、高性能、跨设备应用的UI开发框架,支持开发者高效的构建跨设备应用UI界面。
使用基于eTS的声明式开发范式的方舟开发框架,采用更接近自然语义的编程方式,让开发者可以直观地描述UI界面,不必关心框架如何实现UI绘制和渲染,实现极简高效开发。开发框架不仅从组件、动效和状态管理三个维度来提供UI能力,还提供了系统能力接口,实现系统能力的极简调用。

关于语法和概念详细请直接看官网官方文档地址:
https://docs.openharmony.cn/pages/v3.1/zh-cn/application-dev/ui/ui-ts-overview.md/
3. 实现思路
时钟翻页效果,用到四个Text组件,使用堆叠容器Stack。底层:用到两个裁剪过后的Text上下显示;顶层:也是用两个裁剪后的Text做动画效果,进行X轴角度旋转。
3.1 裁剪Text
裁剪前:
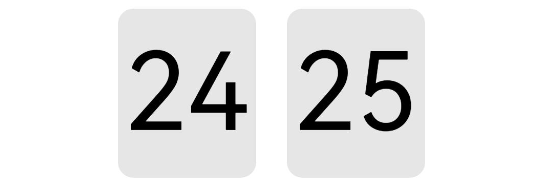
裁剪后:

使用形状裁剪属性clip
裁剪Text上半部:从坐标(0,0)往下裁剪,clip(new Rect({ width: this.width, height: this.height / 2 }))
裁剪Text下半部:从坐标(0,height / 2)往下裁剪,clip(new Path().commands(this.bottomPath))
@Entry
@Component
struct Test {
  private width = 90
  private height = 110
  private fontSize = 70
  private defaultBgColor = '#ffe6e6e6'
  private borderRadius = 10

  // 下半部裁剪路径
  private bottomPath = `M0 ${vp2px(this.height / 2)}
  L${vp2px(this.width)} ${vp2px(this.height / 2)}
  L${vp2px(this.width)} ${vp2px(this.height)}
  L0 ${vp2px(this.height)} Z`

  build() {
    Row() {

      Text('24')
        .width(this.width)
        .height(this.height)
        .fontColor(Color.Black)
        .fontSize(this.fontSize)
        .textAlign(TextAlign.Center)
        .borderRadius(this.borderRadius)
        .backgroundColor(this.defaultBgColor)
        .clip(new Rect({ width: this.width, height: this.height / 2 }))

      Text('25')
        .margin({left:20})
        .width(this.width)
        .height(this.height)
        .fontColor(Color.Black)
        .fontSize(this.fontSize)
        .textAlign(TextAlign.Center)
        .borderRadius(this.borderRadius)
        .backgroundColor(this.defaultBgColor)
        .clip(new Path().commands(this.bottomPath))

    }.width('100%')
    .height('100%')
    .justifyContent(FlexAlign.Center)
  }
}
3.2 放入堆叠容器
四个裁剪后的Text放入到堆叠容器中(代码片段):
    Stack() {
      // 底层文字上部
      Text(this.newValue)
        ......
        .clip(new Rect({ width: this.width, height: this.height / 2 }))

      // 底层文字下部
      Text(this.oldValue)
        ......
        .clip(new Path().commands(this.bottomPath))

      // 顶层文字上部动画
      Text(this.oldValue)
        ......
        .clip(new Rect({ width: this.width, height: this.height / 2 }))
        .rotate({ x: 1, centerY: '50%', angle: this.angleTop })

      // 顶层文字下部动画
      Text(this.newValue)
        ......
        .margin({ top: 3 })
        .clip(new Path().commands(this.bottomPath))
        .rotate({ x: 1, centerY: '50%', angle: this.angleBottom })
    }
3.3 使用显式动画
先顶层上部的动画,上部旋转角度从0到90停止,接下来执行顶层下部的动画,下部旋转角度从-90到0停止,停止完后重置初始状态,上部旋转角度 = 0、下部旋转角度 = -90(代码片段)
/**
   * 启动顶层文字上部动画
   */
  startTopAnimate() {
    animateTo({
      duration: 400,
      onFinish: () => {
        this.startBottomAnimate()
        this.animateBgColor = '#ffededed'
      }
    }, () => {
      this.angleTop = 90
      this.animateBgColor = '#ffc5c5c5'
    })
  }

  /**
   * 启动顶层文字下部动画
   */
  startBottomAnimate() {
    animateTo({
      duration: 400,
      onFinish: () => {
        this.angleTop = 0
        this.angleBottom = -90
        this.animateBgColor = this.defaultBgColor
        this.oldValue = this.newValue
      }
    }, () => {
      this.angleBottom = 0
      this.animateBgColor = this.defaultBgColor
    })
  }
3.4 组件封装
翻页逻辑封装成组件,提供给外部调用,根据外部传入的双向数据绑定:newValue,监听数据变化,有变化则启动翻页动画(代码片段):
@Component
export struct FlipPage {
  // 顶层上部动画角度
  @State angleTop: number = 0
  // 顶层下部动画角度
  @State angleBottom: number = -90
  // 旧值
  @Prop oldValue: string
  // 新值,加入监听
  @Link @Watch('valueChange') newValue: string

  /**
   * 监听新值变化
   */
  valueChange() {
    if (this.oldValue === this.newValue) return
    this.startTopAnimate()
  }

  build() {
    Stack() {
      // 底层文字上部
      Text(this.newValue)
        ......
        .clip(new Rect({ width: this.width, height: this.height / 2 }))

      // 底层文字下部
      Text(this.oldValue)
        ......
        .clip(new Path().commands(this.bottomPath))

      // 顶层文字上部动画
      Text(this.oldValue)
        ......
        .clip(new Rect({ width: this.width, height: this.height / 2 }))
        .rotate({ x: 1, centerY: '50%', angle: this.angleTop })

      // 顶层文字下部动画
      Text(this.newValue)
        ......
        .margin({ top: 3 })
        .clip(new Path().commands(this.bottomPath))
        .rotate({ x: 1, centerY: '50%', angle: this.angleBottom })
    }
  }
  /**
  * 启动顶层文字上部动画
  */
  startTopAnimate() {
    ......
  }
3.5 外部调用
界面加载成功后,开启循环定时器setInterval、间隔1秒更新时间。更改newValue的值,翻页组件内部进行动画翻页。
import { FlipPage } from '../componet/FlipPage'

@Entry
@Component
struct Index {
  // 小时-旧值
  @State oldHours: string = ''
  // 小时-新值
  @State newHours: string = ''
  // 分钟-旧值
  @State oldMinutes: string = ''
  // 分钟-新值
  @State newMinutes: string = ''
  // 秒数-旧值
  @State oldSeconds: string = ''
  // 秒数-新值
  @State newSeconds: string = ''

  @Builder Colon() {
    Column() {
      Circle().width(8).height(8).fill(Color.Black)
      Circle().width(8).height(8).fill(Color.Black).margin({ top: 10 })
    }.padding(10)
  }

  build() {
    Row() {
      // 翻页组件-显示小时
      FlipPage({ oldValue: this.oldHours, newValue: $newHours })
      // 冒号
      this.Colon()
      // 翻页组件-显示分钟
      FlipPage({ oldValue: this.oldMinutes, newValue: $newMinutes })
      // 冒号
      this.Colon()
      // 翻页组件-显示秒数
      FlipPage({ oldValue: this.oldSeconds, newValue: $newSeconds })
    }
    .justifyContent(FlexAlign.Center)
    .width('100%')
    .height('100%')
    .onAppear(() => {
      // 开启定时器
      this.initDate()
      setInterval(() => {
        this.updateDate()
      }, 1000)
    })
  }

  /**
   * 初始化时间
   */
  initDate() {
    let date = new Date()
    // 设置小时
    this.oldHours = this.format(date.getHours())
    // 设置分钟
    this.oldMinutes = this.format(date.getMinutes())
    // 设置秒数
    this.oldSeconds = this.format(date.getSeconds())
    // 设置新的秒数
    this.newSeconds = date.getSeconds() + 1 === 60 ? '00' : this.format(date.getSeconds() + 1)
  }

  /**
   * 更新时间
   */
  updateDate() {
    let date = new Date()
    console.log(`${date.getHours()}时${date.getMinutes()}分${date.getSeconds()}秒`)
    // 当新值改变,才有动画
    if (date.getSeconds() === 59) {
      this.newSeconds = '00'
      this.newMinutes = date.getMinutes() + 1 === 60 ? '00' : this.format(date.getMinutes() + 1)
      if (date.getMinutes() === 59) {
        this.newHours = date.getHours() + 1 === 24 ? '00' : this.format(date.getHours() + 1)
      }
    } else {
      this.newSeconds = this.format(date.getSeconds() + 1)
    }
  }

  /**
   * 不足十位前面补零
   */
  format(param) {
    let value = '' + param
    if (param < 10) {
      value = '0' + param
    }
    return value
  }
}
4. 总结
根据上面的实现思路和5个步骤流程,相信你也掌握了翻页时钟原理,拆分成一步一步还是很简单的,最主要还是对API的熟悉和声明式语法的掌握。HarmonyOS的API是根据OpenHarmony去更新的,两者区别语法都一样,只是OpenHarmony的API比较新,功能比较完善和成熟的,所以本项目直接使用OpenHarmony SDK开发。
写在最后
我们最近正带着大家玩嗨OpenHarmony。如果你有好玩的东东,欢迎投稿,让我们一起嗨起来!有点子,有想法,有Demo,立刻联系我们:合作邮箱:zzliang@atomsource.org